


Please note – this guide is extremely outdated.
Preface by Accomp: Hi everyone. This guide comes from you compliments of a valued FFXIV community member, Lynx Laroux. You may recognize the name from his work on the FFXIV Starting Guide. I was very excited when I reached out to him to see if he was interested in writing for Accomp.me and he gladly offered. This is a great guide that very thoroughly covers how to play the Pugilist class and Monk job. So please take the time to give it a read and show your appreciation for the quality work Lynx Laroux has put in and continues to provide for the FFXIV community. Enjoy your read!
So you want to be a Pugilist/[Monk]?
I decided to take some time and break down the Pugilist and Monk abilities and do some theory crafting on how the skills interact, what situations they are best utilized in and how they are used together to increase the overall damage output. I say ‘Rotation’ but this guide is not a simple Rotation A, Rotation B, Rotation C. I started breaking down the charts like that to start and it just doesn’t work. I realized instead, there is a structure that allows players to adapt to situations on the fly, but also giving bonuses to players for doing this while cycling through 3 Forms and adding in positioning for bonus damage. The result is an excellent damage class that will challenge players on many levels. I hope you enjoy the guide, any feedback is more than welcome and I’ll be sure to adjust things as they change in game or new strategies are developed! Please let me know if you have any suggestions or find any mistakes I may have missed: LynxLaroux@yahoo.com
The Basics
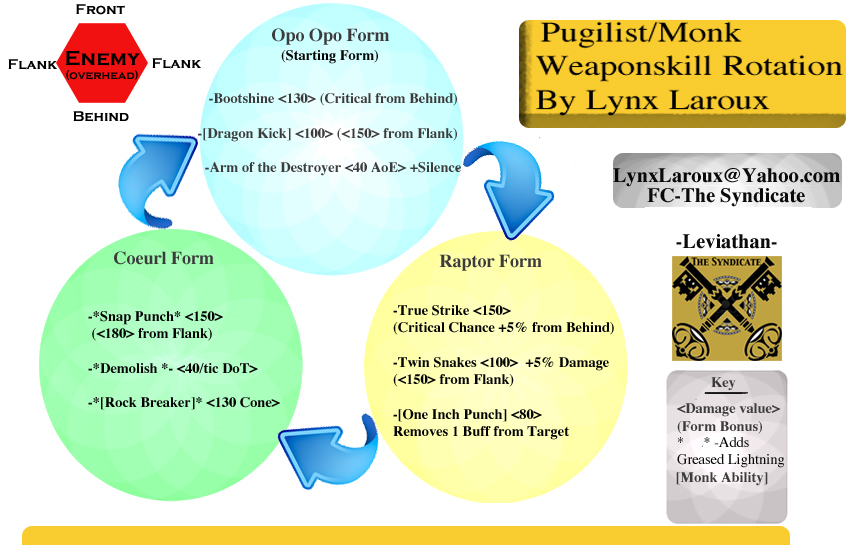
Your Pugilist, and later your Monk, have 3 forms that you will be constantly cycling through to chain together combos. Each form has 3 distinct skills, one being [Monk] exclusive, the other 2 are available on both [Monk] and Pugilist. These attacks can be strung together in many different combinations to adapt to different situations you may encounter. Simply using an attack in your current form will change your form so Forms passively change. In addition to keeping your buffs on and integrating extra damage through Non-Form abilities I call Add-on’s and keeping your two DoT’s active, Mastering these combinations is what will set you apart from other players on this class/job. The most important thing for any starting fist fighter is to memorize the positional bonuses for the 5 of 9 weapon skills that have them.
Opening form: Opo-Opo Form
- Bootshine – Standard Weaponskill (Positional)
- Arm of the Destroyer – AoE attack + Silence
- [Dragon Kick] – Standard Monk Weaponskill (Positional)
Middle form: Raptor Form
- True Strike – Weaponskill (Positional Crit Chance)
- Twin Snakes – Weaponskill +5% Damage Up (Positional)
- [One Ilm Punch] – Dispel 1 buff from target
Closing form: Coerul Form
- Snap Punch – Weaponskill + Greased Lightning Effect (Positional)
- Demolish – Damage over time + Greased Lightning Effect
- [Rockbreaker] – AoE Weaponskill (Positional : Cone attack)
Positional Bonus
Flank Bonus : [Dragon Kick], Twin Snakes, Snap Punch Behind Bonus: Bootshine, True Strike.
Pugilist-Monk Rotation Chart
Fists of Fury
Maximizing your damage output will mean chaining together as many of these combos as quickly as you can while ensuring proper positioning to attain each form’s bonus. For Levels 1-30, your main combo will be: Bootshine > Any Raptor Form attack > Snap Punch. Get used to starting rotations from behind the enemy to always get that bonus damage! At Level 15, be sure to use Touch of Death (DoT damage) every 30 seconds (approximately every 4th rotation) for even more damage output, when you get Demolish (Level 30) I would suggest using Touch of Death after closing a combo with Demolish to keep the DoTs on approximately the same timer as they both last 30 seconds. Starting at Level 30 your choices start to branch out, you should be getting a feel for your own personal play-style so look at your new abilities and find the best way to integrate them into your rotation. Also, knowing which abilities will require Monk and which don’t also play a role. I’ll be integrating more information on Cross-Class skills for the Monk and Pugilist and how you can work them into your fights in the next update!
Go Greased Lightning!
This buff is the secret to the awesome damaging power of the Pugilist and Monk, but also what makes it one of the more difficult classes to play. Greased Lightning is a buff that gives you a 7% Bonus to Attack Damage and a 5% bonus to Skill Speed for 12 seconds for azartnye-igry. At level 20, you gain a trait allowing you to stack a second Greased Lightning buff and at 40 you can stack a third!
Greased Lightning Bonus
- 1x stack: +7% Attack Damage, +5% Skill Speed
- 2x stacks: +14% Attack Damage, +10% Skill Speed
- 3x stacks: +21% Attack Damage, +15% Skill Speed
Seeing as how the buff only lasts 12 seconds and it would take you 7.5 seconds with perfect execution to attain a 2nd Greased Lightning, you can see how important it is to stack anything that may increase your skill speed to decrease your overall Global cooldown reducing the time it would take you to stack 3 for maximum damage output. For a Level 50 Monk, the quickest combo to get Greased Lightning that requires no re-positioning at all is: [Dragon Kick] > Twin Snakes > Snap Punch* (All get a bonus from Flank positioning) *If there is a large group of enemies, don’t hesitate to close with [Rockbreaker] (Level 30) for even better overall damage. For a Pugilist starting at level 6 you can use: Bootshine (Behind) > True Strike (Behind) > Snap Punch (Flank) or Demolish (Level 30) (DoT).
Float Like a Butterfly
Monk has some of the most powerful Damage Up buffs in the game so far. In addition to Greased Lightning from all of your Coerul Form attacks, Internal Release (Level 12) will net you an additional 20% critical hit rate for 15 seconds (30% at Level 36 with Enhanced Internal Release Trait) with a cooldown of 60 seconds.. This is a huge damage increase especially when stacked with all the other bonuses. Pop this a few rotations in along with your other damage abilities once your tank has built up some hate. At later levels, you can stack this with Fists of Fire (Level 40) to add an additional 5% to your Greased Lightning bonus and your Twin Snakes damage bonus!
Silence is Golden
While Bootshine is your go-to opener, if you need to stop a nasty spell or you are in a group of nasty casting type mobs, you should change your Opening Opo-Opo Form’s Bootshine to Arm of the Destroyer (Level 26), which can be used to immediately silence all enemies within a 5 yalm radius for 1 second. Save this for boss fights or large groups of spellcasting enemies as the TP is over twice the cost at 130 compared to Bootshine’s 60 TP.
Give an Inch and They Take a Mile
[One Ilm Punch] (Level 45) is a unique move for Monk usable from Raptor Form. This will eliminate one buff from an enemy. Use this dispel move as a substitute for either of your other two standard Raptor Form attacks when facing an enemy with strong Buffs!
Add-on Attacks
At level 10, you get your first Add-on attack. I call them this because they can be added between Forms in a combo without interrupting the cycle for extra damage output.
- Haymaker (Level 10) – This move can only be used after evading an attack and not only does it only cost 40 TP making it a very low cost attack, it also packs a punch with 170 potency and adds a 20% Slow buff for 12 seconds on the target. Whoa! Obviously you want to use anytime it becomes available! This move will be especially useful for solo play or in groups when the DPS are expected to take on the adds and you will have Aggro on you.
- Touch of Death (Level 15) – which I mentioned above, will give you 270 potency of damage over 30 seconds, using this approximately every 4 rotations will keep the DoT up.
- Howling Fist (Level 46) – which will do 170 damage to all enemies in a line in front of you for 10 yalms. This move is situational and is on its own cooldown. It can only be used every 60 seconds so use it wisely to maximize damage output by hitting as many targets as possible, especially if you have a lot of Damage Up buffs stacked.
Stunned!
Steel Peak (Level 38) and the Monk only [Shoulder Tackle] (Level 35) will stun an enemy. Steel Peak is used up close while [Shoulder Tackle] must be used at least 10 yalms away from your target and cannot be used while bound. You can and should use these stuns to stop high risk/high damage attacks, especially during boss fights.
Endgame Monk Play
In addition at Level 50 you will have traits that boost your abilities to even greater heights!
- Enhanced Featherfoot (Level 14)
- Enhanced Twin Snakes (Level 28)
- Enhanced Internal Release (Level 36)
- Enhanced Mantra (Level 48)
With all 9 options available to you I suggest a few general rules as you figure out how to react and adjust your rotations as enemies throw new surprises your way:
- Stack Greased Lightning as much as possible as soon as possible
- This is what will shoot your DPS through the roof!
- Perfect your positioning
- The bonuses don’t mean anything if you aren’t lined up correctly! Think of a monster like a clock. If 12 is the front of a monster, Flanks are 3 and 9 with 6 being behind the monster.
- Use the Add-ons
- Finding a rhythm in your rotation and remembering to use these abilities is going to be very important for Monk damage output.
- Prioritize Twin Snakes over True Strike
- Not only does Twin Snakes keep the same positioning as [Dragon Kick] for easy combos, it keeps a 5% damage increase for all your moves, which IMO outweighs having to change positions for a 5% chance of scoring a critical hit. However you can always alternate them as you like, leaning more towards True Strike as you stack your attack up buffs.
- Close with [Rockbreaker] for groups of enemies
- Laying down the AoE damage on your closing hit will surely leave your enemies bruised and battered across Eorzea, make sure however you aren’t waking up slept enemies with your AoE attacks!
- Avoid breaking Combos
- The form status lasts for 12 seconds, so you can throw in buffs or other skills in between your combos, but make sure you finish your cycles as often as possible for Greased Lightning to maximize damage output. Having to start over again will eat up your DPS.
- Help your Tank out!
- While you are a fighting machine, don’t forget to help protect your squishies from adds or aggro. In addition, if you pull hate unintentionally make sure your tank has control again before you start laying down the massive damage combos. If you need the tank to remove a monster from you, try to position the monster in their range for whichever hate tools they are using be it a combo, Flash or Steel Cyclone.
- Help your Healer, too!
- Don’t forget, while attacking is important, you have defensive moves like Featherfoot (Level 4) for evasion up, Fists of Earth (Level 22) to reduce damage by 10% and Second Wind (Level 8) to help heal yourself and turn the tide of battle.
Utilizing these tips when you get caught in an AoE, pull aggro or when you are soloing will make all the difference in beating that tough enemy!
Perfect Balance
This will require some actual testing and more theory crafting, but the main uses I see are:
- Continuously stack Greased Lightning by using only Coerul Form Attacks.
- Add on DoT and Debuffs in any order (True Strike, Touch of Death, etc.)
- Remove a lot of buffs at one time using One Ilm Punch
- Spam AoE [Rockbreaker] for a large group of enemies or adds in a Boss fight.
Closing Thoughts
The Pugilist and Monk are looking to be one of the more challenging Damage types in the game, but only when played efficiently. While the kit may not be as strong as other Damage Dealers overall, the speed and versatility of this class will make it one of the best in skilled hands. I hope this guide was helpful to all of you, feel free to share this with your friends and post it as you wish, please just give me credit and link back to the original work!
- Contact me: LynxLaroux@yahoo.com
- Pugilist and Monk Abilities List
Lynx Laroux – The Syndicate – Leviathan Server